Working with Photos/Pictures - the Basics
If you start doing a lot of photo editing, or you would like to do something more ambitious then you will need a better program. Paint.Net is free and is good. For this lesson, we will use the Paint program the comes with Windows
Using the Paint program
To start the Paint progam, click on the Start button and type Paint. A list of different matches will be shown - the one at
the top will be called 'Paint - Desktop app' - click on that to start Paint
There are two ways to work with an image
- Either: In the Paint program, Click on the File tab and then click 'Open'. On the left hand side scroll to select 'Pictures' if it isn't already selected and then choose the photo that you'd like to work with.
- Or: Use the File Explorer to find the image that you'd like to work with. Then either choode Edit from the tool bar or Right click on the file and select 'Edit' or 'Open With' and choose Paint
Easier Viewing without resizing
If the image is too large to view all at once then you can zoom out. Click on the View tabk and click on zoom out until the image fits on the screen.
Note that you haven't changed the image at this point: you've just changed how it is shown on the screen.
Resizing an image
Often photos are too large to send or upload: they could be used as they are but it's usually more convenient to send a smaller image. On the Home tab is a 'Resize' option 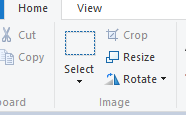 - click on Resize.
The resize dialog is actually 'Resize and Skew' - the top part is resize and the bottom is skew - we will ignore skew.
There are two ways to resize - by percentage or to an actual size. A useful final size is to have the longest side (often the width) to be 640 pixels. To do that, select Pixels and type 640 in the Horizontal box. The vertical box will change automatically if the 'Maintain aspect ratio' box is ticked. Unless you deliberately want to stretch a photo then you keep the 'Maintain aspect ratio' box ticked.
Alternatively, select 'Percentage' and type a number between 1 and 100: a value of 50 will reduce each side by 50% (so half and the photo will be a quarter of it's original size)
You can also enlarge a photo by making the Percentage value greater than 100, or typing the desired width or height.
Remember, so long as you haven't saved the picture, you can undo your changes using the Undo icon 
Cropping
Sometimes we only want part of the image and discard the rest. In the Home tab, click on the Select button and then click on the photo where you would like the top left of the new image to be. Keep the left button down and move the mouse to the bottom right. The part of the image that you have selected will have a box around it.
If you make a mistake, then you can always click the undo button.
To crop the image, click on the Crop button. If you changed the view then you can go back to the View tab and click on the 100% button to see the image at it's full size. You can then resize the new image if you'd like.
Saving
If you want to replace the original image, click File and then Save. If you want to keep the original, click File and save as, then give the image a new name.
Adding a photo on a Facebook post
Use the Add Photo/Video button and select your image.
Lesson 5