Basic Word processing
Ways of Working
There are two main ways of working when writing documents. The first involves geting the words into the document, ignoring all formatting. Once the words are done, then they can be formatted. In the second way of working, the text is formatted as the document is written. I personally much prefer the former method.
Many of the functions (changing fonts, cutting and pasting alignments) can be done in mor than one way. There are 'toolbars' above the document that have icons (buttons) that can be used to perform the function. The same functions are also available under the Menus. There is no difference bwteen the two. Sometimes the menu item has more options.
Sample Letter
The first thing that we will do with the letter is change the font. The default for a letter is Times New Roman (size 12) and this is an ugly font (in my opinion).
The font can be changed at any level (character, word, phrase, sentence, paragraph or whole document). We could even have every character in a different font. To change the font we first select the text that will appear in the new font and then change the font. The easiest way to change the font for the whole document is to select the whole document: go to Edit and click Select All. All the text in the document will be highlighted (selected).
The font is shown in the tool bar above the document
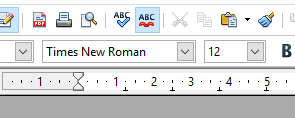
If the properties side bar is open then the font is also shown there.
Use the drop-down to select a font that you like. You can also change the size of the text.
Alignment.
Currently all the text is left aligned - in other words the paragraphs all start on the left of the page. Traditionally, in a letter the sender's address is right aligned - the end of each line of the address is at the right hand side of the page. To fix this we first need to select the address. Move the cursor to the start of the address. Click and hold down the left button. Move the mouse until the text is all selected.
Now that the text is selected we can make changes In the toolbar to the right of the chosen font are four icons that determine how the text will be aligned.
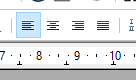
For the selected text the  (Left justifted) will be selected. Hover over each icon to see what each says. Click on
  to right justify the text. Try using the Centred icon
  to see what that does.
Basic Styling
Bold text. Let's try to make the confirmation date (19th May) stand out in the document by making it bold. Select the date and click the  icon (between the font and the justification icons). The bold icon is like a switch. If the text is already bold, then clicking the icon will make it normal again.
Italic text. We can make the text "Sale of Goods Act" italic in a similar way. Select the text and then click on the  icon. Again this icon is a toggle.
Coloured text. We can make some (or all) text appear in a different colour. Let's make the word 'used' towards them end of the first sentence. Select the word - a quick way to select a word is to double click on the word. Then click on the on the left of the font colour icon  . A grid of colours will appear - find the red square and click on it.
Highlighting text. We can make some (or all) text appear as if it has been highlighted. Make the 'not useable' at the end of the first sentence. Select the words and then click on the highlight text  . You can select the colour using the arrow, like we did on the font colour.
Spelling
The two icons for spelling  are above the font selection boxes. If the AutoSpellCheck is not switched on then click the button. The word Banklands will be shown with a wavy red line under it, as will the word 'contracte'. Obviously we can easily correct the spelling here by just deleting the final e. However, if we weren't sure how to spell 'contract' we can right click on the word and we will be shown a list of possible (correct) spellings. If we right click on Banklands, we can choose one of the options at the bottom of the list. 'Ignore' will ignore this occurrence of the word and 'Ignore All' will ignore all occurrences of the word in the document will be ignored. Ignoring means "don't show this as an error". When you close the document and open it again, any ignored words will be shown as errors again. You can also chose to add the word to the built-in dictionary
The wavy red lines will not be shown when the document is printed
Even though the tool tips say "spelling and grammar", writer does not check grammar.
Basic Editing
Copying and pasting work in the same way as they did in Notepad. Select the text, then use Edit -> Copy or Edit -> Cut. Edit -> Paste can be used to paste the text to where you would like it to appear. There are also icons for cut, copy and paste above the font selection 
We can undo changes using the Edit -> Undo option. Unlike Notepad we can Undo multiple changes. If we make a mistake and undo something that we didn't mean to undo then we can 'Redo' the command. The undo and redo icons are above the Bold and Italic icons 
Lesson 4